ADVERTISEMENT
—
ADVERTISEMENT
### Step-by-Step: How to Remove Black Marks
**1. Start with a Dry Brush**
Use a dry toothbrush or cloth to brush off loose dirt and debris. This preps the surface for deeper cleaning.
**2. Make a Gentle Cleaning Solution**
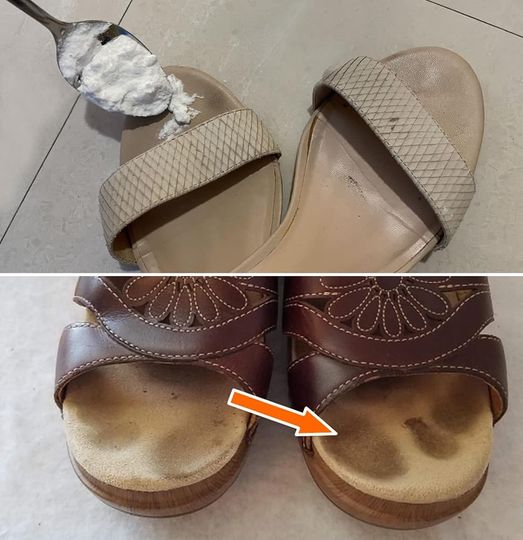
Mix one part baking soda with one part water (or vinegar for extra cleaning power) to form a paste. Alternatively, a few drops of dish soap in warm water works too.
**3. Scrub the Affected Areas**
Dip your toothbrush or cloth into the paste and gently scrub the black marks in circular motions. Be careful not to oversaturate leather or suede materials.
**4. Use a Magic Eraser for Stubborn Spots**
For extra-stubborn marks, lightly dampen a magic eraser and rub the affected area. This is especially effective on rubber or synthetic soles.
**5. Wipe and Rinse**
Use a clean, damp cloth to wipe away any residue. Avoid soaking the sandal, especially if it’s made of leather or cork.
**6. Let Them Air Dry**
Allow the sandals to dry naturally in a well-ventilated area, away from direct sunlight or heat, which can warp or crack the material.
—
### Bonus Tips
ADVERTISEMENT
* **Prevent future marks** by wiping down your sandals every few wears.
* Use **foot powders or sprays** to reduce sweat buildup.
* Store sandals in a **cool, dry place** to avoid discoloration over time.
—
**In Conclusion**
Black marks on sandals may be annoying, but they’re far from permanent. With a bit of care and the right cleaning approach, your sandals can look as fresh as the day you bought them. So don’t toss them out just yet — a quick clean-up might be all they need to walk many more miles in style!
—
ADVERTISEMENT
Would you like this adapted for a specific material like leather, suede, or rubber sandals?
ADVERTISEMENT
