ADVERTISEMENT
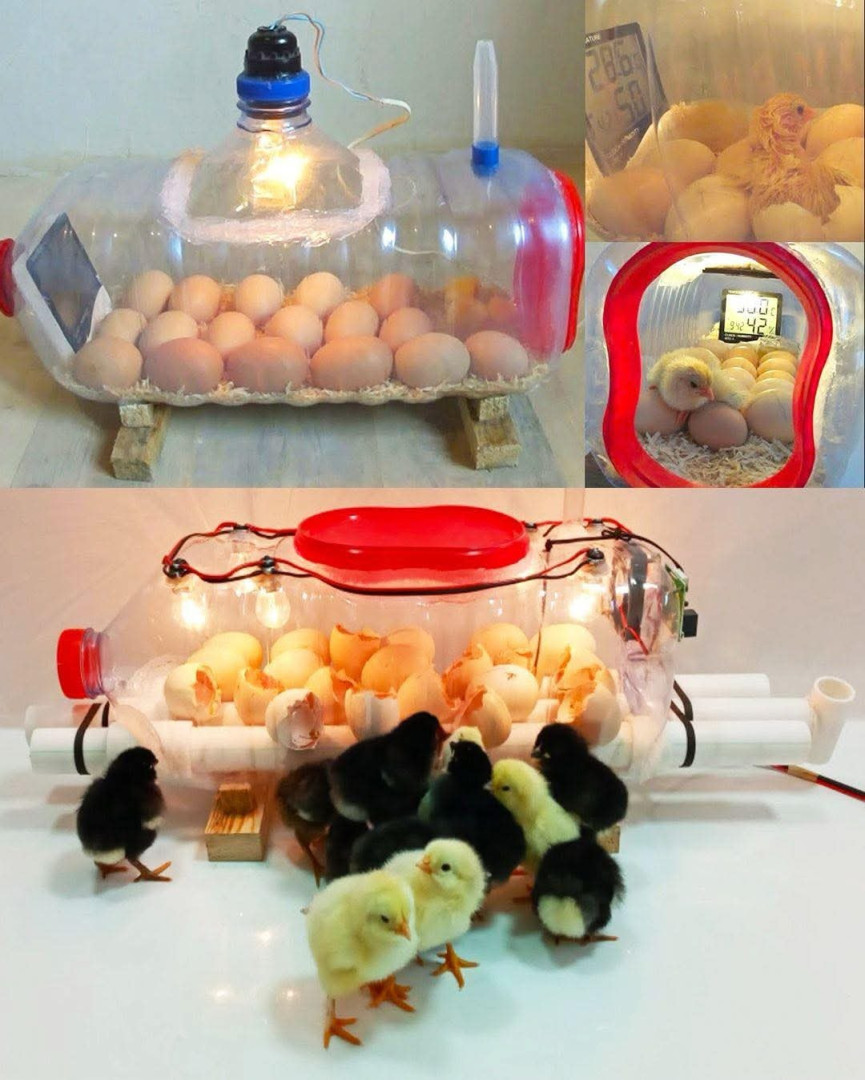
### ✅ Step 2: Set Up the Heat Source
ADVERTISEMENT
* Attach the **light bulb** to a lamp holder or socket.
* Carefully position the bulb **inside the bottle** without it touching the plastic.
* Cut a small hole in the side of the bottle to pass the lamp’s wire through.
> ⚠️ **Safety Tip:** Use low-wattage bulbs to prevent overheating or melting the plastic. Avoid LEDs — they don’t produce enough heat.
### ✅ Step 3: Create the Egg Chamber
* Place a layer of **cotton, sponge, or soft cloth** at the bottom to cushion the eggs.
* Set the **small bowl of water** inside to maintain humidity.
* Gently place your **fertile eggs** inside, spacing them evenly.
### ✅ Step 4: Regulate Temperature & Humidity
* Insert a **thermometer** inside the bottle to monitor the temperature.
* Ideal incubation temperature: **99–102°F (37.5–39°C)**
* Humidity should be around **50–55%** for the first 18 days, then **65–70%** for the final 3 days.
> 🔄 Turn the eggs **3–5 times a day** to mimic a mother hen’s behavior. Stop turning on day 18.
—
## 🐣 Hatching Timeline
ADVERTISEMENT
* Most chicken eggs hatch in **21 days**.
* You may notice slight movement or chirping in the final 2–3 days.
* Once a chick begins to **pip** (crack the shell), give it time. Do not assist unless absolutely necessary.
—
## 🛠️ Tips for Success
* Keep the incubator in a **stable, warm room**, away from windows or drafts.
* Monitor temperature **daily** — small fluctuations are okay, but avoid extremes.
* **Don’t open the lid too often**, especially during the last 3 days before hatching.
* For better insulation, wrap the outside of the bottle with **aluminum foil** or a towel.
—
ADVERTISEMENT
## 🐥 Final Thoughts
Building a **homemade egg incubator with a water bottle** is not only budget-friendly, but also a fun and educational project. Whether you’re a hobbyist, a student, or a beginner farmer, this DIY incubator can help you hatch eggs successfully with a bit of care and patience.
It’s proof that you don’t need fancy equipment to start something truly amazing — just a bit of ingenuity and a humble plastic bottle.
—
Want to upgrade your DIY incubator with a thermostat or fan? Or need help identifying fertile eggs? Let me know — I’m here to help your chicks get the best start in life! 🐣
ADVERTISEMENT
