ADVERTISEMENT
—
ADVERTISEMENT
## 🎨 Add-Ons for Decorating
* Natural food coloring or mica powder
* Dried flowers, herbs, or leaves
* Eco-friendly glitter or metallic flakes
* Silicone molds, cookie cutters, or baking sheets
* Toothpicks or skewers (for hanging holes)
—
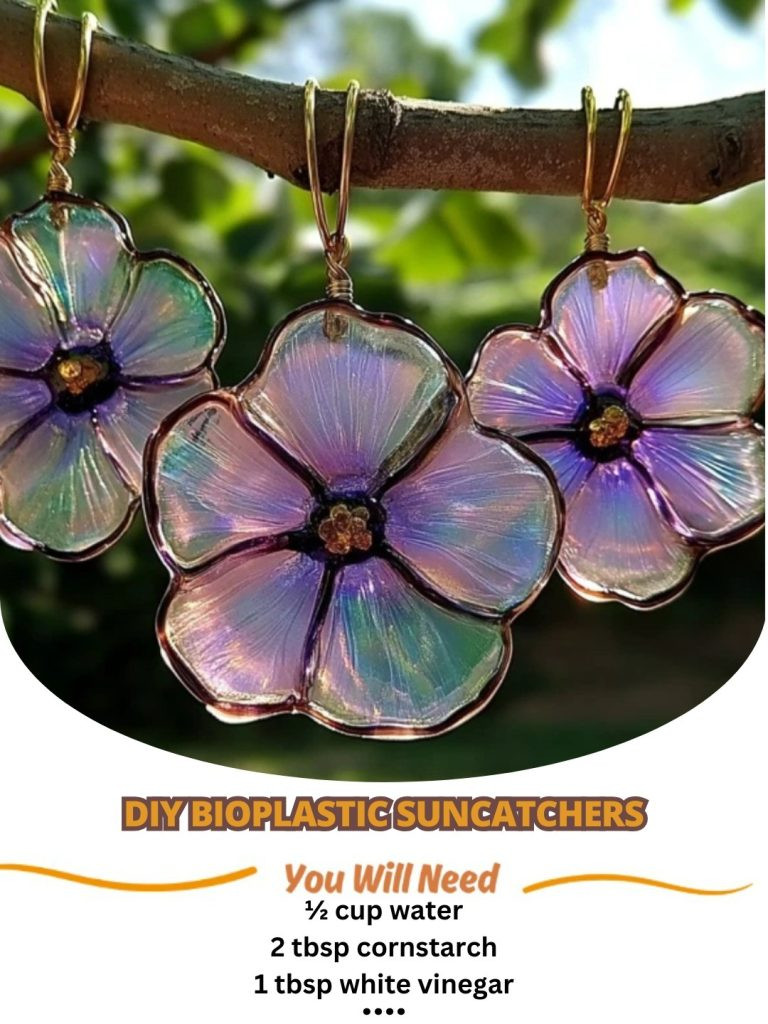
## 🛠️ How to Make Bioplastic Suncatchers
### 1. **Mix Your Ingredients**
In a small saucepan, combine cornstarch, water, vinegar, and glycerin. Stir until smooth.
### 2. **Heat It Up**
Place the saucepan over low heat, stirring constantly. The mixture will begin to thicken into a gel-like texture — similar to pudding.
### 3. **Pour & Shape**
ADVERTISEMENT
Once thick, pour the bioplastic onto a flat surface (lined with parchment paper or silicone mat). Smooth it out with a spoon or spatula. For individual shapes, pour into silicone molds or use cookie cutters.
### 4. **Add Decorations**
While it’s still wet:
* Drop in flower petals or glitter
* Swirl in colors with toothpicks
* Add a hanging hole near the top with a skewer
### 5. **Let It Dry**
ADVERTISEMENT
Air dry for **24–48 hours**, depending on thickness and humidity. It will become firm but slightly flexible.
—
## ✨ Pro Tips for Success
* **Too brittle?** Add a bit more glycerin next time.
* **Too soft?** Use less glycerin or dry longer.
* **Want clear results?** Use very fine glitter and avoid cloudy dyes.
* **For a stained-glass effect:** Use transparent colorants and thinner layers.
—
## 💡 How to Monetize Your Bioplastic Creations
Thinking of turning your hobby into income? These suncatchers are **perfect for handmade businesses**:
### 🛒 Sell the Finished Product
* Package as window decor, holiday ornaments, or kids’ room accents
* Target eco-conscious customers on **Etsy, Instagram, or local markets**
### 📦 Create DIY Kits
* Pre-measure dry ingredients & include instructions
* Add dried flowers or eco glitter for a deluxe version
* Great for kids’ birthday favors or homeschool kits
### 🎥 Make Content
* Post tutorials on TikTok, YouTube, or Pinterest
* Offer paid printable guides or ebooks
* Collaborate with eco brands or schools
### 🎁 Offer Workshops
* Host classes for kids, scouts, or community centers
* Add it to summer camps or eco-craft sessions
* Partner with local makerspaces or libraries
—
## 📦 Eco-Packaging Ideas
* Recycled kraft paper bags
* Compostable clear sleeves (for suncatchers or kits)
* Seed paper tags for branding
* Hand-stamped or illustrated instruction cards
—
## 🧼 End of Life: How to Dispose Sustainably
Once your bioplastic suncatcher has served its purpose:
* **Cut it into small pieces and compost it**, or
* **Bury it in garden soil** — it will naturally break down over time
* Avoid tossing in regular plastic recycling — it’s organic, not synthetic!
—
## 🌞 Final Thoughts
DIY Bioplastic Suncatchers are **the perfect blend of fun, creativity, and sustainability**. Whether you’re crafting with kids, adding eco-art to your home, or starting a side hustle, this project is low-stress and high-impact.
**Less waste, more beauty — and maybe even a little extra income.**
Give it a try — and don’t be surprised when people start asking,
**”Where did you get that?”** 🌈
—
Want a printable recipe card, eBook, or business launch checklist for your bioplastic creations? Just ask — I’d love to help!
ADVERTISEMENT
